Tesla Model S: Gearbox Fluid - Small Rear Drive Unit (Remove and Replace)
Warning: If the vehicle has air suspension, activate "Jack" mode on the touchscreen before raising and supporting the vehicle.
Drain & Refill
- Position the vehicle in preparation for raising it, but do not raise it at this time.
- Air suspension vehicles only: Depressurize the rear LH air spring (refer to procedure).
- Engage "Tow" mode.
- Remove the LH rear wheel (refer to procedure).
- Remove the mid aero shield (refer to procedure).
- Prepare a drain pan to catch the gearbox fluid.
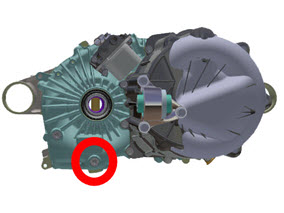
- On the LH side of the gearbox, release the drain plug. Allow the
fluid to completely drain, then reinstall the drain plug (torque 28
Nm).
Caution: Do not attempt to fill the drive unit through the upper plug.
- Remove the LH parking brake caliper (refer to procedure).
- Release the bolts that secure the following 3 fasteners to the
knuckle:
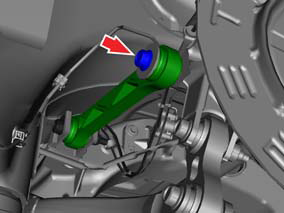
- Upper link
.png)
- Toe link
- Shock absorber
.png)
- Upper link
- Use a driveshaft extractor to release the axle from the drive unit.
- Release the axle seal from the drive unit.
- Slowly fill the gearbox through the axle opening.
Caution: If the gearbox is filled too quickly, fluid will spill out onto the drive unit casing.
Note: Use the fluid specified in General Information > Fluids and Capacities > Fluids .
Note: Use the amount specified in General Information > Fluids and Capacities > Fluid Capacities .
Caution: Use exactly the specified amount of transmission fluid. Do not fill to the top of the axle opening.

- Inspect the axle seal for damage and replace if necessary.
- When installing the driveshaft into the drive unit:
- Ensure that the opening of the snap ring is facing towards the bottom of the drive unit.
- Do not damage or displace the drive unit seal.
- Verify that the driveshaft is fully seated by carefully pushing it into the drive unit until there is an audible "click" from the snap ring.
- Reinstall the 3 fasteners to the knuckle. Caution: Do not fully torque the fasteners at this time; they must be torqued when the vehicle is at ride height.
- Reinstall the parking brake caliper.
- Reinstall the rear LH wheel.
- Disengage "Tow" mode.
- Air suspension vehicles only: Repressurize the rear LH air spring (refer to procedure).
- With the vehicle at ride height, fully torque the 3 fasteners to
the knuckle:
- Upper link (140 Nm)
- Toe link (130 Nm)
- Shock absorber (torque 140 Nm)
- Reinstall the mid aero shield.
READ NEXT:
 Oil Seal - Differential to Driveshaft Assembly - LH (Remove and Replace)
Special tools required for this procedure:
Supplier
Part Number
Description
Tesla
1051509-
Driveshaft Assembly - LH (Remove and Replace)
Warning: If the vehicle has air suspension, activate "Jack"
mode on the touchscreen before raising and supporting the vehicle.
Special tool(s) required for this procedure:
Suppl
SEE MORE:
Brake Pads - Park Brake - Burnishing
Warning: Be sure to comply
with all local traffic safety laws and only perform such maneuvers in a
suitable location such as a nonresidential side street with little to no
traffic.
Caution: Do not perform this
procedure on a vehicle that has new rotors unless they have gone through
a
Assembly - Mesh Grille - Defrost (Remove and Replace)
Removal
Remove the top pad for access to the mesh grille (refer to
procedure)
Remove the defrost mesh grille.
Installation
Installation procedure is the reverse of removal.
When installing the new mesh grille, ensure that all 4 retaining
cli
