Tesla Model S: Forward Junction Box - 2nd Generation - 40 Amp Fuse (RWD) (Remove and Replace)
Warning: Only technicians who have been trained in High Voltage Awareness are permitted to perform this procedure. Proper personal protective equipment (PPE) and insulating HV gloves with a minimum rating of class 00 (500V) must be worn any time a high voltage cable is handled. Refer to Tech Note TN-15-92-003, "High Voltage Awareness Care Points" for additional safety information.
Note: This procedure only applies to RWD vehicles with the 2nd generation High Voltage configuration. The Forward Junction Box (FJB) is part of the DCDC converter for vehicles with the 1st generation High Voltage Configuration.
Special tools required for this procedure:
| Supplier | Part Number | Description |
| Tesla | 1058193-00-A | Fuse Puller, large (blue) |
| Tesla | 1051659-00-A | Access Service Tool, Frunk |
- Perform the vehicle electrical isolation procedure (refer to procedure).
- Remove the underhood storage unit (refer to procedure).
- Position the frunk access service tool.
- Disconnect the clips (x4) that secure the coolant hose to the
crossbar.

- Remove the crossbar from the vehicle.
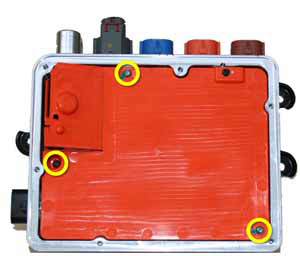
- Release the bolts (x6) that secure the forward junction box
cover (torque 6.5 Nm). Remove the cover.

- Use a small, insulated screwdriver or similar tool to pry open
the cover on the RH side of the FJB.
Warning: Do not use a metallic tool to open the cover.

- Use a multimeter to check voltages between:
- B+ to ground
- B- to ground
- B+ and B-
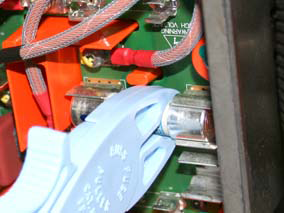
- Remove the screws (x3) that secure the plastic cover (torque 3
Nm).
- Use the fuse puller to remove the fuse.

Installation procedure is the reverse of removal.
READ NEXT:
 Forward Junction Box (Dual Motor) (Remove and Replace)
Warning: Only technicians who have been trained in High
Voltage Awareness are permitted to perform this procedure. Proper
personal protective equipment (PPE) and insulating HV gloves with a
HV Junction Box - 1st Generation (Remove and Replace)
Warning: Only technicians who have been trained in High
Voltage Awareness are permitted to perform this procedure. Proper
personal protective equipment (PPE) and insulating HV gloves with a
HV Junction Box - Cover - 1st Generation (Remove and Replace)
Warning: Only technicians who have been trained in High
Voltage Awareness are permitted to perform this procedure. Proper
personal protective equipment (PPE) and insulating HV gloves with a
SEE MORE:
Charging Locations
To display charging locations on the map, touch the
map's search bar, then touch Charging. Charging
locations are shown in a list (with the closest charging
location at the top of the list) and represented by
corresponding pins on the map. Touch a pin to display
more information, navigate to it
Pull Onto Flatbed Truck From Rear
(Using Tow Eye)
NOTE: If Model S has no low voltage power, you need an
external low voltage power supply to open the hood or
use the touchscreen. See If Vehicle Has No Power.
NOTE: Vehicles equipped with a hitch receiver cannot be
pulled from the rear tow eye. Use the tow bar or hitch
receiver only to pull the
