Tesla Model S: Battery Coolant Pump 2 (Remove and Replace)
Warning: If the 12V power supply is disconnected, do not attempt to open any doors with door glass in closed position. Failure to follow this instruction could result in door glass shatter.
Note: Before disconnecting the 12V power supply, ensure that the driver's door window is fully open. Failure to follow this instruction could result in vehicle lockout.
Coolant pump locations:

RWD Model S

Dual Motor Model S
| 1 | Powertrain coolant pump 1 | RWD vehicle |
| 2 | Battery coolant pump 2 | RWD vehicle |
| 3 | Battery coolant pump 1 | RWD vehicle |
| 4 | Powertrain coolant pump 2 | Dual Motor vehicle |
| 5 | Powertrain coolant pump 1 | Dual Motor vehicle |
| 6 | Battery coolant pump 2 | Dual Motor vehicle |
| 7 | Battery coolant pump 1 | Dual Motor vehicle |
- Disconnect 12V power.
- Rear wheel drive (RWD): Refer to procedure.
- Dual Motor: Refer to procedure.
- Remove the underhood storage unit for access (refer to procedure).
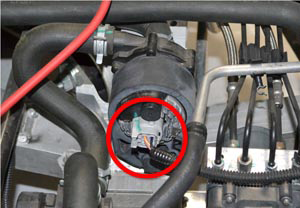
- Disconnect the harness from the coolant pump.
- Position a container beneath the pump in order to catch any coolant that is spilled in a later step.
- Clamp the inlet and outlet hoses.
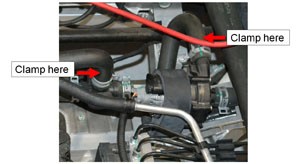
- Release the spring clamps from the inlet and outlet hoses. Caution: Do not remove the clamps that were placed on the inlet and outlet hoses in step 5.
- Remove the inlet and outlet hoses from the coolant pump assembly.
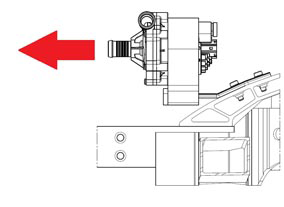
- Slide the coolant pump assembly toward the LH side of the
vehicle to release it from the bracket. Remove the pump assembly
from the vehicle.
Note: The coolant pump assembly includes both the coolant pump and the rubber isolator.
- Use a marker to draw a line on the top of the rubber isolator and pump. Note: This line helps to align the isolator when installing it on the new coolant pump.
- Carefully remove the rubber isolator from the coolant pump.
Caution: Do not damage or remove the push vent.

- Clean any spilled coolant.
Installation procedure is the reverse of removal, except for the following:
- Clean any spilled coolant.
- When placing the rubber isolator over the coolant pump, ensure that the line that was drawn in step 9 of the "Remove" section aligns with the top of the new coolant pump.
- When all components have been reinstalled, refill and bleed the cooling system (refer to procedure).
READ NEXT:
 Powertrain Coolant Pump 1 (RWD) (Remove and Replace)
Coolant pump locations:
RWD Model S
Dual Motor Model S
1
Powertrain coolant pump 1
RWD vehicle
2
Battery
Powertrain Coolant Pump 1 (Dual Motor) (Remove and Replace)
Coolant pump locations:
RWD Model S
Dual Motor Model S
1
Powertrain coolant pump 1
RWD vehicle
2
Battery
Powertrain Coolant Pump 2 (Remove and Replace)
Coolant pump locations:
RWD Model S
Dual Motor Model S
1
Powertrain coolant pump 1
RWD vehicle
2
Battery
SEE MORE:
Finisher - Floor - Center Console (Remove and Replace)
Special tool required for this procedure:
Supplier
Part Number
Description
Tesla
1065399-00-A
Skin Wedge Tool
Removal
If equipped, remove
Slave Charger - LH - 2nd Generation (Remove and Replace) - Removal
Note: This procedure describes how to remove and
install the 2nd generation slave charger. If the vehicle is equipped
with a 1st generation slave charger, refer to procedure 44100102 (refer
to procedure).
Warning: Only technicians who have been trained in High
Voltage Awareness
