Tesla Model S: Finisher - Floor - Center Console (Remove and Replace)
Tesla Model S (2012-2025) Service Manual / Interior trim / Finisher - Floor - Center Console (Remove and Replace)
Special tool required for this procedure:
| Supplier | Part Number | Description |
| Tesla | 1065399-00-A | Skin Wedge Tool |
- If equipped, remove the drop in center console assembly (refer to procedure).
- Inspect the skin wedge tool:
- If the tapered end of the tool is not already wrapped with anti-abrasion tape, cut a 2 in (50 mm) piece of anti-abrasion tape (1003224-00-A or equivalent) and wrap the curved end of the tool.
- If the tapered end of the tool is already wrapped with tape, continue this procedure.
Bottom of tool Top of tool 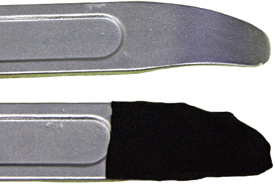

- On both sides of the vehicle, insert the curved end of the tool
under the rear of the floor finisher so the taped side presses
against the center console.

- Gently pry against the center console until the Dual Lock on the underside of the floor finisher is released.
- Lift the rear of the floor finisher to release the Dual Lock on
the front of the floor finisher.

- Remove the floor finisher from the vehicle.
Installation procedure is the reverse of removal.
READ NEXT:
 Headlining (Remove and Install)
Note: This procedure does not remove headlining from
vehicle, the headlining remains captive within the body.
Removal
Remove LH 'A' post trim (refer to procedure)
Remove RH '
Headlining (Remove and Replace)
Removal
Remove front windshield (refer to procedure)
Lower headlining for access (refer to procedure)
With assistance remove headlining through front windshield
opening.
Remov
Headliner - Panoramic Roof (Remove and Install)
Note: This procedure does not remove the headliner from
vehicle; the headliner remains inside the vehicle cabin supported by
the tops of the seats.
Removal
Remove the LH A-pillar
SEE MORE:
Steering Angle Sensor (SAS) Precautions
Caution: Always follow the procedure for fitting and checking
the SAS as instructed in the air bag and SRS repairs section. Comply
with all safety and installation procedures to ensure the system
functions correctly.
Caution: Observe the following precautions:
Do not unlo
Steering Column (Remove and Replace)
Removal
Ensure that the front road wheels are in a straight ahead
position.
Remove the driver's side lower dash trim (refer to procedure).
Remove the steering controller module (refer to procedure).
Disconnect the steering column motor harness connectors (x2).
© 2019-2025 Copyright www.tesms.org
