Tesla Model S: Wheel Sensor - TPMS (Remove and Replace) - Removal
Tesla Model S (2012-2026) Service Manual / Wheels and Tires / Wheel Sensor - TPMS (Remove and Replace) / Wheel Sensor - TPMS (Remove and Replace) - Removal
Warning: If the vehicle has air suspension, activate "Jack" mode on the touchscreen before raising and supporting the vehicle.
Removal
- Remove the wheel (refer to procedure).
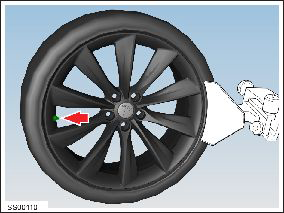
- Remove the cap and inner core from the valve to deflate the tire.
Note: Check direction of tire machine rotation before starting procedure.
-
Release the tire beading from the wheel on both
sides.
Caution: Ensure that the machine is away from the valve and sensor.
Caution: The TPMS wheel sensor can be damaged if the instructions are not followed correctly.
- Apply a suitable lubricant to each tire bead.
- Position and secure the wheel on the tire machine with the front face up.
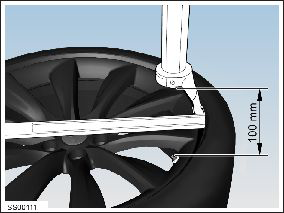
-
Rotate the wheel and tire so that the mounting
head is 100 mm in front of the valve. Using a tire lever, lift the
tire bead onto the mounting head.
Note: Ensure that the tire bead does not slip on the wheel during removal/installation.
- Release the tire bead from the wheel by rotating the machine.
-
Rotate the wheel and tire so that the mounting
head is 100 mm in front of the valve. Using a tire lever with a
wheel protector, lift the bottom tire bead onto the mounting head.
Note: Ensure that the tire bead does not slip on the wheel during removal/installation.

- Release the tire bead from the wheel by rotating the machine and remove the tire. Do not remove the tire lever; it will stop the tire from sliding back and could damage the sensor.
- Remove the nut that secures the valve to the wheel. Remove both the valve and wheel sensor.
- Remove and discard the valve and screw from the wheel sensor.
READ NEXT:
 Wheel Sensor - TPMS (Remove and Replace) - Installation
Installation
Clean and inspect the wheel and valve hole.
Remove any dirt, burrs, or swarf.
Install the valve retaining screw to the wheel
sensor.
Note: Ensure
TPMS Sensor - ID Learn Procedure - Baolong
Setup
Turn on the Tesla SmarTool and select menu item
3 - Wakeup ID.
Starting with the front left wheel, hold the
tool against the tire sidewall, near the valve stem, and pre
TPMS Sensor - ID Learn Procedure - Continental
Setup
Press the Power button and watch the display.
When the display shows "ATEQ VT30", note the version number:
If the version is EA1-07, refer to TN-14-92-005,
SEE MORE:
Trim - Dash - Driver's Side - Lower (Remove and Replace)
Removal
Remove the LH instrument panel side cover (refer to procedure).
Remove the screw that secures the footwell cover to the
instrument panel trim panel (torque 2 Nm).
Using a suitable tool, release the clips (x9) that secure the
trim to the dash.
Caution:
Approved Methods for Transporting
A flatbed truck or comparable transport vehicle is the
recommended method of transporting Model S. The
vehicle can face either direction when using a flatbed.
If Model S must be transported without a flatbed truck,
then wheel lifts and dollies must be used to ensure that
all four wheels are off
© 2019-2026 Copyright www.tesms.org
