Tesla Model S: Panel - Aero Shield - Front (Remove and Replace)
Tesla Model S (2012-2025) Service Manual / Exterior fittings / Panel - Aero Shield - Front (Remove and Replace)
Warning: If the vehicle has air suspension, activate "Jack" mode on the touchscreen before raising and supporting the vehicle.
Removal
- Raise and support the vehicle (refer to procedure). Warning: Do not work on an incorrectly supported vehicle.
- Remove the plastic rivets (x12, x14, or x15) that secure the
undershield to the chin spoiler and subframe.
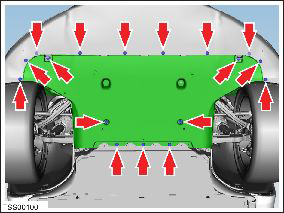
Note: Vehicles with the underbody shield installed do not have the 3 rivets that secure the rear of the front aeroshield. However, there are 2 additional plastic rivets that need to be removed.
Note: Vehicles with a composite front carrier have bolts (x2) that secure the front corners of the aeroshield (torque 4 Nm).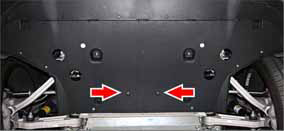
- Reposition the front fascia LH lower edge and remove the plastic rivet that secures the undershield to the subframe.
- Repeat the previous step and remove the RH plastic rivet.
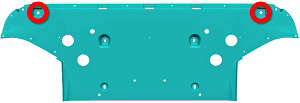
- Remove the bolts (x4) that secure the front undershield to the
body (torque 3 Nm).
- Remove the bolts (x4) that secure the front undershield to the
body (torque 4 Nm).
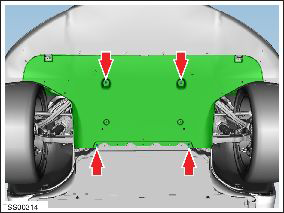
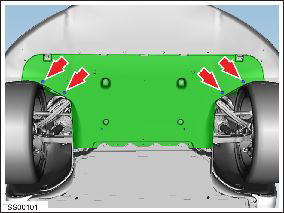
- Carefully release the undershield from the chin spoiler lip fixings (x3) and remove the undershield.
Installation procedure is the reverse of removal.
READ NEXT:
 Panel - Aero Shield - Mid (Remove and Replace)
Removal
Remove the LH diffuser tray rails (refer to procedure).
Repeat step 1 for the RH diffuser tray rails.
Remove the bolts (x9) that secure the mid aero shield panel to
the bo
Panel - Diffuser Tray - Rear (Remove and Replace)
Removal
Remove rear fascia assembly (refer to procedure)
Remove bolts (x6) and plastic rivets (x2) securing rear diffuser
to rear fascia and applique (torque 3 Nm).
Rails - Diffuser Tray Rear - LH (Remove and Replace)
Warning: If the vehicle has air suspension, activate "Jack"
mode on the touchscreen before raising and supporting the vehicle.
Removal
Raise and support the vehicle (refer to pro
SEE MORE:
Motor - Seat Tilt - Driver's Seat (Remove and Replace)
Removal
Remove the driver's seat (refer to procedure).
Place the seat on a clean work surface.
Remove the screw that secures the inner side cover to the seat
(torque 1 Nm).
Carefully release the inner side cover
Module - Passive Safety Restraint - PSRCM (Remove and Replace)
Warning: If the 12V power supply is disconnected, do
not attempt to open any doors with door glass in closed position.
Failure to follow this instruction could result in door glass
shatter.
Note: Before disconnecting the 12V power supply,
ensure that the driver's door window
© 2019-2025 Copyright www.tesms.org
