Tesla Model S: Wheel Sensor - TPMS (Remove and Replace) - Installation
Tesla Model S (2012-2026) Service Manual / Wheels and Tires / Wheel Sensor - TPMS (Remove and Replace) / Wheel Sensor - TPMS (Remove and Replace) - Installation
Installation
- Clean and inspect the wheel and valve hole. Remove any dirt, burrs, or swarf.
-
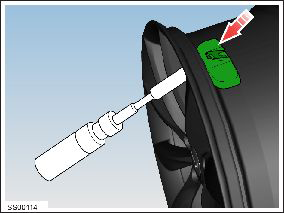
Install the valve retaining screw to the wheel
sensor.
Note: Ensure that the square faces are parallel with the slot in the sensor.

- Screw the valve onto the sensor screw. Ensure that the valve screw is free to move in the slot.
- Position the sensor and valve to wheel and loosely secure it with the retaining nut.
-
Holding the sensor firmly against the inside of
the wheel, tighten the valve retaining nut.
- Baolong TPMS: Torque 5 Nm.
- Continental TPMS: Torque 8 Nm.

- Inspect the sensor location; both feet should be in contact with the wheel. If the sensor is not firmly located it should be reinstalled using a new valve and screw.
- Apply a suitable lubricant to each tire bead.
-
Secure the wheel on the tire machine with the
front facing up. Position the wheel so that the valve is opposite of
the mounting head and then place the tire on the wheel and bring the
mounting head down to the wheel.

- Push the lower tire bead over the wheel and mounting head. Rotate the machine so the last part of the bead fits over the wheel just before the valve. Note: Ensure that the tire bead does not slip on the wheel during removal/installation.
- Reposition the wheel and tire so that the valve is opposite of the mounting head.
-
Push the upper tire bead over the rim and
mounting head. Rotate the machine so the last part of the bead fits
over the wheel just before the valve.
Note: Ensure tire bead does not slip on the wheel during removal/installation.

- Ensure that the tire bead is correctly located between the sensor and the wheel.
- Inflate the tire until both the tire beads are seated on the wheel. Adjust the tire pressure to the recommended pressure and install the valve cap.
- Check the tire for air leaks.
- Balance the wheel.
- Install the wheel.
- Lower the vehicle.
-
Perform the wheel sensor TPMS ID learn
procedure.
- Baolong TPMS: (refer to procedure).
- Continental TPMS: (refer to procedure).
READ NEXT:
 TPMS Sensor - ID Learn Procedure - Baolong
Setup
Turn on the Tesla SmarTool and select menu item
3 - Wakeup ID.
Starting with the front left wheel, hold the
tool against the tire sidewall, near the valve stem, and pre
 TPMS Sensor - ID Learn Procedure - Continental
Setup
Press the Power button and watch the display.
When the display shows "ATEQ VT30", note the version number:
If the version is EA1-07, refer to TN-14-92-005,
 TPMS - Set Thresholds
Note: This procedure
only applies to vehicles with the Baolong TPMS system (vehicles
built before approximately September 10, 2014).
Set thresholds
In the Service Manual, refe
SEE MORE:
 Sway Bar - Front (RWD) (Remove and Replace)
Warning: If the vehicle has air suspension, activate "Jack"
mode on the touchscreen before raising and supporting the vehicle.
Removal
Remove the underhood storage unit (refer to procedure).
Remove the front upper wheel arch liners (refer to procedure).
Remove and d
 Parameters
Autopark detects potential parking spaces based on the
following parameters:
Perpendicular Parking
Your driving speed must be below 8 mph (13 km/h). If
driving too fast, Autopark may not be able to
accurately detect your desired parking space.
The parking space must be at least 7.2 feet (2.
© 2019-2026 Copyright www.tesms.org

