Tesla Model S: Seal - Door - Front - LH (Remove and Replace)
Tesla Model S (2012-2025) Service Manual / Closures / Seal - Door - Front - LH (Remove and Replace)
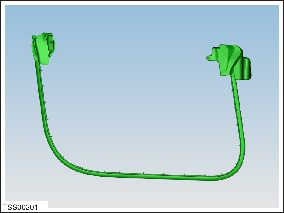
Removal
- Remove door trim (refer to procedure)
- Release clips (x4) securing flap seal ends front and rear. Note: Components have been removed in this graphic to aid clarity. Caution: Take care not to damage component(s).
- Carefully release remaining clips (x19).

- Remove door seal.
READ NEXT:
 Seal - Door - Rear - C Pillar - Margin - LH (Remove and Replace)
Removal
Remove door trim (refer to procedure)
Release clips (x3) securing flap seal end to door.
Note: Components have been removed in this
graphic to aid
Seal - Rear Door - LH (Remove and Replace)
Removal
Remove door trim (refer to procedure)
Release clips (x2) securing flap seal end to door.
Note: Components have been removed in this graphic
to aid
Seal - Hood (Remove and Replace)
Removal
Open the luggage compartment.
Release the seal from luggage compartment surround.
Note: Components have been removed in this
graphic to aid clarity
SEE MORE:
Antenna - RF Filter - RH (Remove and Replace)
Removal
Remove the RH liftgate trim (refer to procedure).
Remove the screw that secures the RF filter to the liftgate
(torque 1 Nm).
Remove the RF filter from the vehicle.
Warranty Service Regions
Tesla Motors provides service for Model S only in countries where it has a
service presence. Service centers accept all incoming Model S vehicles,
regardless of where they were purchased. However, the warranty for a
particular vehicle is only valid in the region where it was originally
purch
© 2019-2025 Copyright www.tesms.org
