Tesla Model S: Remove Front Drive Unit
-
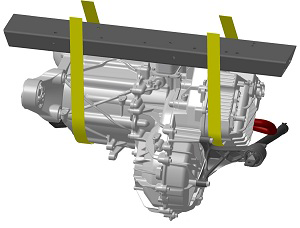
Position the support jack on top of the front
crossmember and secure the 2 screws to the front crossmember.
The support jack mounts to the bolt holes on top of the front
crossmember that secured the coolant reservoir.

- Fully lower both mounts of the support jack.
The next 2 steps explain how to position the straps underneath the front drive unit in order to remove it with the support jack. Work from the underhood area while an assistant works from the LH wheelwell.

-
Position the LH strap:
-
Slide the strap between the LH motor mount
and the front drive unit.

- Have the assistant slide the strap inward, as close to the differential housing as possible. Caution: Ensure that there are no coolant hoses between the strap and the front drive unit.
- Reach behind the front crossmember and pull the strap up and over the top of the support jack.
- Secure the two ends of the strap with the carabiner.
- Slide the strap so that the carabiner is approximately 6 in (152 mm) above the front crossmember.
-
Slide the strap between the LH motor mount
and the front drive unit.
Work from the underhood area while an assistant works from the RH wheelwell
-
Position the RH strap:
- Lower one end of the strap over the top of the support jack and behind the front crossmember.
- Have the assistant position the strap underneath the drive unit, as close to the differential housing as possible. Caution: Ensure that there are no coolant hoses between the strap and the front drive unit.
- Reach beneath the drive unit and pull the strap upwards.
- Secure the two ends of the strap with the carabiner.
- Slide the strap so that the carabiner is approximately 6 inches above the front crossmember.
- Raise the support jack until both straps are fully taut.
- Release the ground strap unit from the drive unit (torque 6 Nm).
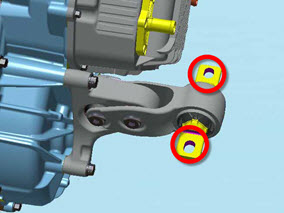
- Raise the vehicle to access the LH wheelwell.
-
Release the 2 bolts that secure the LH side
motor mount to the body (torque 50 Nm).
- Disconnect the 3 electrical harnesses from the steering rack.
-
Position the steering rack protector over the
plastic housing on the LH side of the steering rack.

Caution: Ensure that the steering rack protector completely covers the plastic housing before continuing.
-
Remove the 3 bolts that secure the motor to the
LH motor mount (torque 38 Nm):

- Raise the vehicle to access the LH wheelwell.
- Use a deep socket to release the rear bolt.
- Lower the vehicle.
- Working from the underhood area, release the front 2 bolts.
- Remove the LH motor mount from the vehicle.
-
Use a driveshaft extractor to remove the LH
halfshaft.
Tip: The halfshaft might
be difficult to remove. If necessary:
- Strike the free end of the driveshaft extractor with a deadblow hammer.
- Grip the free end of the extractor with a pair of pliers to provide additional leverage.
- Loosen the LH bolt on the support jack to release tension on the strap, then have an assistant rotate the shaft from the wheelwell. Immediately tighten the strap on the support jack.
- Secure the tilt-lift extension to the crane.
- Set the crane to the 1.5 ton mark.
-
Secure the crane to the front drive unit at the
locations shown.

-
Release the 4 bolts that secure the motor to
the RH mount:
Note: Not all 4 bolts can be completely removed. Loosen the bolts so that the motor is not secured to the motor mount. The RH motor mount is not removed in this procedure.

- Working from the underhood area, remove the front upper bolt.
- Working from the underhood area, release the front lower bolt. Note: This bolt cannot be fully removed; it is retained inside the mount threads during removal.
- Working from the RH wheelwell, remove the rear upper bolt.
- Working from the RH wheelwell, release the rear lower bolt. Note: This bolt cannot be fully removed; it is retained inside the mount threads during removal.
- Raise the motor until the top of the heat dissipater is approximately 10 mm beneath the front crossmember.
-
Slowly raise the crane while rotating the RH
side of the motor toward the LH side of the vehicle.
Caution: Do not damage the steering rack.

- Once the motor is approximately halfway out of the vehicle, disconnect the electrical harness from coolant pump 4. Note: The coolant hose, pump, and bracket are removed with the motor.
- Continue removing the motor; alternate between raising the crane and lowering the support jack.
- Once the differential has cleared the steering rack, remove the straps from the motor so that it is supported entirely by the crane.
- Remove the motor from the vehicle.
READ NEXT:
 Front Drive Unit (From Above) (Remove and Install)
- Installation
Front Drive Unit (From Above) (Remove and Install)
- Installation
Installation
Use alcohol wipes to clean the mating surfaces
between the RH motor mount and drive unit.
Ensure that the support jack is secured to the
front crossmember.
Front Drive Unit (From Above) (Remove and Replace)
Note: If possible, use the
"From Below" procedure to remove and replace the front drive unit
(refer to procedure).
Removal
Remove the front drive unit
(refer to procedure).
Transfer Compo
SEE MORE:
Seal - Door - Rear - C Pillar - Margin - LH (Remove and Replace)
Removal
Remove door trim (refer to procedure)
Release clips (x3) securing flap seal end to door.
Note: Components have been removed in this
graphic to aid clarity.
Caution: Take care not to damage component(s).
Carefully release remai
Hose - Front HVAC - Drain (Dual Motor) (Remove and Replace)
Remove
Perform the electrical isolation procedure (refer to procedure).
Remove the RH steering brace:
Remove the bolt that secures the steering brace to
the subframe (torque 26 Nm).
