Tesla Model S: Cover - Back Rest - Driver's Seat (Install)
Tesla Model S (2012-2025) Service Manual / Seats / Cover - Back Rest - Driver's Seat (Remove and Install) / Cover - Back Rest - Driver's Seat (Install)
Installation
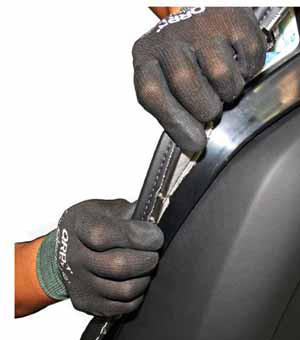
- Install new fir tree clips (x4) into the new seat back:

- Position the fir tree clip into the bracket.

- Use a pair of pliers to push the clips into the center of
the bracket. This locks the clips in place.

- Position the fir tree clip into the bracket.
- Install a new foam pad over the fir tree clips in the plastic
seat back.
Caution: Ensure that the new foam pad is installed
correctly: The holes at the base of the seat back are closer
together than the holes at the top of the seat back.

- Ensure that the interior foam is installed correctly:
- Ensure that the headrest section of the seat frame fits
entirely in the groove in the head rest foam.


1 Correct: Head rest frame seated in groove 2 Incorrect: Head rest frame not seated in groove - Ensure that both sides of the seat back foam overlap the
metal seat frame.

1 Foam wraps around side of metal seat frame
- Ensure that the headrest section of the seat frame fits
entirely in the groove in the head rest foam.
- Insert the hook on the seat back into the indentation on the
back of the headrest foam.

1 1: Hook fits into indentation - Have an assistant support the seat by pushing on the seat back.
Align the 2 bottom fir tree clips on the interior of the seat back
with the holes in the bottom of the metal frame. Gently push on the
bottom of the seat frame to engage the fir tree clips.

- Push firmly on the top and bottom of the RH side of the new seat back to secure the fir tree clips.
- Repeat the previous step on the LH side.
- Gently pull around all edges of the seat back to ensure that it is securely installed.
- Insert the lip on the inside of the headrest upholstery into the
base of the groove on the front of the foam headrest. Ensure that
the lip does not fold inward during the next step.


1 Correct: Lip on inside of headrest upholstery seated in groove 2 Incorrect: Lip on inside of headrest upholstery folded inward - While holding the seam on the outside of the headrest upholstery
in place, pull one side the headrest upholstery up and over the top
of the headrest. Working towards the other side, continue pulling
the upholstery up and over the top of the headrest.

- Gently massage the upholstery on the front of the headrest
upwards so that it forms a lip on the top of the headrest.


- On both sides of the seat, set the lip of the inner padding into
the groove on the foam. Ensure that the lip does not fold inward
during the next step.


1 Correct: Lip on inner padding seated in groove 2 Incorrect: Lip on inner padding folded inward - Bend the upholstery around both sides of the seat at the
shoulder. Push the upholstery into the seat back to engage the
clips.

- Pull downwards on the upholstery. Ensure that the foam at the
base of the seat overlaps the side of the seat back.


1 Foam overlaps side of seat back - Working downwards towards the base of the seat, massage the
upholstery to remove any wrinkles, then press firmly to attach all
clips on the side of the upholstery.


- Pull outward on both sides of the headrest upholstery, then push
inward to secure the clips to the plastic seat back. Do not secure
the clips on the top of the headrest upholstery yet.


1 Push in this area only - At the top of the headrest upholstery, push the ribbing upward,
then secure the clips.

Caution: Before proceeding, ensure that there are no unattached clips.1 Push plastic ribbing upward before securing clips 
1 Upholstery clip not attached to seat frame - Workings upwards, massage the sides of the headrest to work out any wrinkles.
Note: Before proceeding, ensure that there are no wrinkles in the upholstery.
- Position the clips on the side shields between the tabs at the
base of the seat upholstery. Press firmly on the outside of the side
shields to secure them in place.
- Align the lip on the rear carpet to the base of the upholstery
on the back of the seat.
Note: The lip is not at the edge of the
carpet; ensure that the lip is positioned correctly before
proceeding.

- While holding the lip in place, pull upwards on the carpet and
tuck it underneath the plastic seat back. Ensure that the carpet is
secure.

- Rotate the seat so that the seat back faces upward. Caution: To avoid damage when moving or rotating the seat, hold the base with one hand and the back with the other. Have an assistant hold the other side in the same manner.
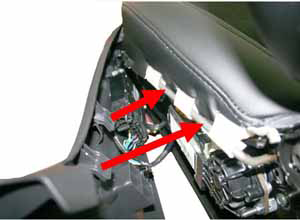
- Reinstall the screws (x2) that secure the side shields.
- Secure the clips to the flex mat.
- Reinstall the seat.
- Ensure that the driver's seat can move in all directions.
- Ensure that the driver's seat heater functions properly.
READ NEXT:
 Trim - Cushion
Trim - Cushion - Driver's Seat (Remove and Replace)
Removal
Note: This component cannot be serviced individually. To
service this component, perform the following:
Foam - Cushion
Foam - Cushion - Driver's Seat (Remove and Replace)
Removal
Note: This component cannot be serviced
individually. To service this component, perform the
following:
Latch - Seat Back - 2nd Row Seat - LH (Remove and Replace)
Removal
Remove LH pivot lock (refer to procedure)
Release and remove latch cover from seat back.
Carefully release cove
SEE MORE:
Cable - Latch - Hood (RWD) (Remove and Replace)
Removal
Remove the hood latch cover (refer to procedure).
Release the hood release cable hook from the latch assembly.
Peel back the edge of the front trunk carpet for access.
Track Mode
Track Mode, available only on Plaid Model S vehicles, is
designed to modify the stability control, traction control,
regenerative braking, and cooling systems to increase
performance and handling while driving on closed
circuit courses. Track Mode improves cornering ability by
intelligently usi
© 2019-2025 Copyright www.tesms.org
