Tesla Model S: Compressor - Air Suspension (Remove and Replace)
Tesla Model S (2012-2025) Service Manual / Suspension / Compressor - Air Suspension (Remove and Replace)
Warning: If the vehicle has air suspension, activate "Jack" mode on the touchscreen before raising and supporting the vehicle. Removal
- Raise and support the vehicle (refer to procedure)
- Depressurize air suspension (refer to procedure)
- Remove underhood storage unit for access (refer to procedure)
- Remove front skid plate (refer to procedure)
- Disconnect air suspension harness connectors (x2).
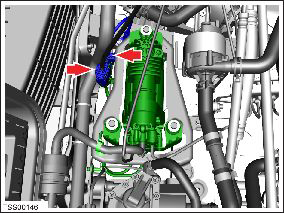
- Release clips (x2) securing harness connector to compressor mounting bracket.
- Release clip securing air intake hose to compressor, release
hose and move aside.

- Disconnect pipe unions (x2) from compressor (torque 3.5 Nm). Caution: Plug pipe connections to prevent ingress of moisture or dirt.
- Remove bolts (x3) securing compressor to mounting bracket
(torque - 4 Nm).

- Remove air suspension compressor.

- Installation procedure is the reverse of removal, except for the following: Warning: Only use cleaning agents and solvents in a well-ventilated area. Note: Clean the affected areas before installation.
- Pressurize air suspension (refer to procedure)
READ NEXT:
 Sensor - Ambient Air Temperature - Compressor (Remove and Replace)
Removal
Remove underhood storage unit for access (refer to procedure)
Position hoses aside for access.
Remove screw securing compressor ambient air temperature sensor
(torque
Solenoid - Air Suspension (Remove and Replace)
Removal
Raise and support the vehicle (refer to procedure).
Depressurize the air suspension (refer to procedure).
Access the solenoid.
For vehicles manufactured be
Reservoir - Air Suspension (Remove and Replace)
Removal
Raise and support the vehicle (refer to procedure).
Depressurize air reservoir (refer to procedure).
Remove underhood storage unit (refer to procedure).
Disconnect 12V
SEE MORE:
Shield - Dust - Brake - Front - 2nd Generation (Retrofit)
Procedure
Remove the front hub assembly
(refer to procedure).
Install the dust shield using the 2 existing
holes in the knuckle (torque 8 Nm).
Use a punch to mark the location of the 3rd
bolt hole onto the knuckle.
Actuator - Defrost (Remove and Replace)
Removal
Remove glove box assembly (refer to procedure)
Disconnect actuator harness connector.
Remove screws (x3) securing defrost door actuator to HVAC
assembly (torque 1 Nm).
Remove actuator.Caution: Take care not to damage component(s).
© 2019-2025 Copyright www.tesms.org
