Tesla Model S: 2nd Row Center Console Assembly (Remove and Replace)
Tesla Model S (2012-2025) Service Manual / Interior trim / 2nd Row Center Console Assembly (Remove and Replace)
Removal
- Fold the RH 2nd row back rest.
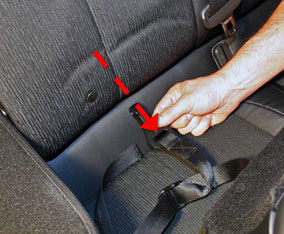
- Loosen the 2nd row center console tether strap behind the center seat.
- Unclip the tether latch from the child seat anchor.

- Pull the tether out between the seat and the back rest to the
front.
- Remove the console from the vehicle.
- Raise the RH rear seat back.
Installation procedure is the reverse of removal.
READ NEXT:
 Center Console - 2nd Row - Executive (Remove and Replace)
Removal
Move both front seats all the way forward.
Remove the felt tray from the console.
Remove the rubber padding from the base of the console and
cupholders.
Release the sc
Finisher - Floor - Center Console (Remove and Replace)
Special tool required for this procedure:
Supplier
Part Number
Description
Headlining (Remove and Install)
Note: This procedure does not remove headlining from
vehicle, the headlining remains captive within the body.
Removal
Remove LH 'A' post trim (refer to procedure)
Remove RH '
SEE MORE:
Event Data Recorder (EDR)
Model S is equipped with an event data recorder (EDR).
The main purpose of an EDR is to record, in certain crash
or near crash-like situations, such as an air bag
deployment or hitting a road obstacle, data to better
understand how the vehicle's systems performed. The
EDR is designed to record
Tail Light Assembly (Non-Motorized Charge Port) - LH (Remove and Replace)
Special tool required for this procedure:
Supplier
Part Number
Description
Tesla
1054190-00-A
Feeler Gauges
Removal
Open the charge port.
© 2019-2025 Copyright www.tesms.org
