Tesla Model S: Wheel Arch Liner - Lower - Front - LH (Remove and Replace)
Tesla Model S (2012-2025) Service Manual / Exterior fittings / Wheel Arch Liner - Lower - Front - LH (Remove and Replace)
Warning: If the vehicle has air suspension, activate "Jack" mode on the touchscreen before raising and supporting the vehicle.
Removal
- Raise and support the vehicle (refer to procedure) Warning: Do not work on an incorrectly supported vehicle.
- Remove road wheel (refer to procedure)
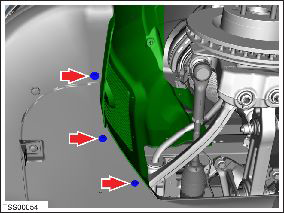
- Remove bolts (x2), plastic rivet (x1) securing wheel arch liner
to undershield and front diffuser panel (torque 3 Nm).
- Remove plastic rivets (x8) securing wheel arch liner to fascia,
front diffuser panel and upper wheel arch liner.
Note: Note installed position of components before removal.
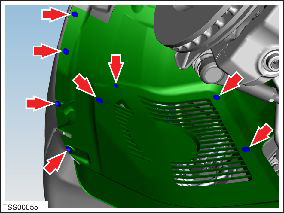
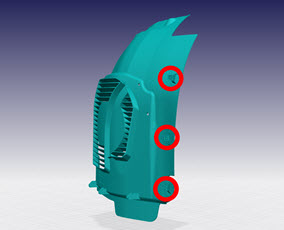
Note: Dual Motor vehicles do not have the 4 outboard rivets. The outboard section of the arch liner is secured by 3 trim clips.
- Remove plastic rivets (x4), nut (x1) securing lower wheel arch
liner to upper wheel arch liner and chassis (torque 3 Nm).
Note: Note installed position of components before removal.
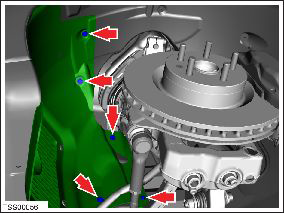
- Remove wheel arch liner.
Installation procedure is the reverse of removal.
READ NEXT:
 Panel - Aero Shield - Front (Remove and Replace)
Warning: If the vehicle has air suspension, activate "Jack"
mode on the touchscreen before raising and supporting the vehicle.
Removal
Raise and support the vehicle (refer to pro
Panel - Aero Shield - Mid (Remove and Replace)
Removal
Remove the LH diffuser tray rails (refer to procedure).
Repeat step 1 for the RH diffuser tray rails.
Remove the bolts (x9) that secure the mid aero shield panel to
the bo
Panel - Diffuser Tray - Rear (Remove and Replace)
Removal
Remove rear fascia assembly (refer to procedure)
Remove bolts (x6) and plastic rivets (x2) securing rear diffuser
to rear fascia and applique (torque 3 Nm).
SEE MORE:
Pipe - High Pressure - Sub-Cool Condenser to Chiller (Remove and Replace)
Removal
Recover refrigerant from the vehicle (refer to procedure)
Remove front skid plate (refer to procedure)
Remove nut (x1) securing pipe to sub-cool condenser (torque 8
Nm).
Remove nut (x1) securing pipe retaining plate to TXV (torque 12
Nm).
Polishing, Touch Up, and Body
Repair
To preserve the cosmetic appearance of the body, you
can occasionally treat the paint surfaces with an
approved polish containing:
Very mild abrasive to remove surface contamination
without removing or damaging the paint.
Filling compounds that fill scratches and reduce their
visibility.
W
© 2019-2025 Copyright www.tesms.org
