Tesla Model S: Skid Bar - Front Subframe (Remove and Replace)
Tesla Model S (2012-2026) Service Manual / Chassis / Skid Bar - Front Subframe (Remove and Replace)
Removal
- Remove the front aero shield panel (refer to procedure).
-
Remove and discard the inner bolts (x2) that
secure the skid bar to the front subframe (10 Nm).
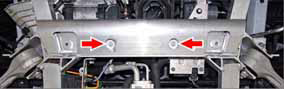
-
If equipped, remove and discard the outer bolts
(x2) that secure the skid bar to the front subframe (10 Nm).

- Remove the skid bar.
Installation procedure is the reverse of removal.
Caution: Use new bolts to install the skid bar. Do not reuse any bolts.
READ NEXT:
 Bash Plate - Front - Stamping (Remove and Replace)
Removal
Remove the front aero shield panel
(refer to procedure).
Remove the bash plate extrusion
(refer to procedure).
Remove and discard the bolts (x2), shoulder
Bash Plate - Front - Extrusion (Remove and Replace)
Removal
Raise and support the vehicle
(refer to procedure).
Remove and discard the bolts (x2) that secure
the bash plate extrusion to the front subframe (10 Nm).
SEE MORE:
LF Antenna - RH - A Post (Remove and Replace)
Warning: If the vehicle has air suspension, activate "Jack"
mode on the touchscreen before raising and supporting the vehicle.
Removal
Raise and support the vehicle (refer to procedure)
Remove RH front wheel arch liner for access (refer to procedure)
Locate LF anten
Applique - Fascia - Front - 1st Generation (Remove and Replace)
Note: This procedure describes how to remove and replace
the 1st generation front fascia applique. If the vehicle is equipped
with a 2nd generation front fascia applique, refer to procedure
10011302 (refer to procedure).
Removal
Remove the front fascia grill (refer to p
© 2019-2026 Copyright www.tesms.org
