Tesla Model S: Shaft - Steering Column - Intermediate Upper (Remove and Replace)
Tesla Model S (2012-2025) Service Manual / Steering / Shaft - Steering Column - Intermediate Upper (Remove and Replace)
Removal
- Remove the driver's side footwell cover (refer to procedure).
- Disconnect the lower intermediate shaft (refer to procedure).
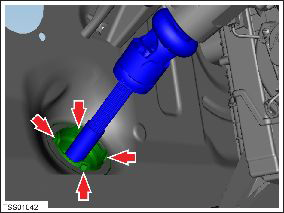
- Disconnect the lower intermediate shaft from the slot in the upper intermediate shaft.
- Release the upper intermediate shaft from the column shaft.
- Release the clips (x4) that secure the steering shaft seal to
the bulkhead.
- Remove the upper intermediate shaft.

Installation procedure is the reverse of removal, except for the following:
Caution: Replace all nylon-insert locknuts.
- Ensure that the upper intermediate shaft to column marks align correctly.
- Run the "Power Steering (EPAS) Control" procedure in Toolbox.
READ NEXT:
 Shaft - Steering Column - Intermediate Upper (Dual Motor) (Remove and
Replace)
Shaft - Steering Column - Intermediate Upper (Dual Motor) (Remove and
Replace)
Warning: If the 12V power supply is disconnected, do
not attempt to open any doors with door glass in closed
position. Failure to follow this instruction could result in
door glass shat
Steering Wheel (Remove and Replace)
Removal
Remove the driver's air bag (refer to procedure).
Position the wheels straight ahead. Mark the steering wheel
relative position to the column.
Remove and discard the bolt
Steering Column (Remove and Replace)
Removal
Ensure that the front road wheels are in a straight ahead
position.
Remove the driver's side lower dash trim (refer to procedure).
Remove the steering controller modul
SEE MORE:
Lights
Control interior and exterior lights. See Lights.
NOTE: You can also control the exterior headlights by
touching the high beam headlights button on the left
side of the steering yoke and then choosing an option
using the touchscreen. See High Beam Headlights.
Display
Appearance: Customize
Checking and Cleaning Wiper
Blades
Periodically clean the edge of the wiper blades and
check the rubber for cracks, splits, and roughness. If
damaged, replace the blade immediately to prevent
damage to the glass and improve visibility.
Contaminants on the windshield, or on the wiper blades,
can reduce the effectiveness of the wi
© 2019-2025 Copyright www.tesms.org
