Tesla Model S: Link - Lower - Aft - LH (Remove and Replace)
Tesla Model S (2012-2025) Service Manual / Suspension / Link - Lower - Aft - LH (Remove and Replace)
Warning: If the vehicle has air suspension, activate "Jack" mode on the touchscreen before raising and supporting the vehicle. Removal
- Loosen the front LH lug nuts.
- Raise and support the vehicle (refer to procedure) Warning: Do not work on an incorrectly supported vehicle.
- If the vehicle is equipped with air suspension, depressurize the air spring .
- Remove the HV Battery (refer to procedure)
- Remove the road wheel (refer to procedure)
- Remove the bolt and nut that secure the front air spring module to the rear lower control arm (torque 140 Nm).
- Compress the spring module and release it from the lower arm.
- Remove and discard the nut that secures the rear lower control
arm to the knuckle (torque 195 Nm).
Caution: To prevent ball joint damage, always hold the ball joint pin with a wrench while loosening or tightening the lock nut.
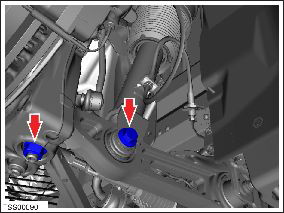
- Mark a witness line on the subframe cam to aid installation.
- Remove the bolt and nut that secure the rear lower control arm
to the subframe (torque 130 Nm).

- Release the rear lower control arm from the subframe.
- Release the ball joint from the knuckle.
- Remove the rear lower control arm.
- Installation is the reverse of removal, except for the following: Caution: Replace all nylon-insert locknuts. Caution: Only fully tighten suspension nuts and bolts when the vehicle is on a 4-post lift and the suspension is in the ride height position. Note: Clean the affected areas before installation.
- Install the cam bolt to the previously marked position. Do not fully tighten the nut at this time. Warning: Install the bolt from the rear. The nut should be attached from the front side of the control arm.
- Transfer the vehicle to a 4 post lift (refer to procedure)
- Pressurize the air spring, if the vehicle has air suspension (refer to procedure)
- Perform a four wheel alignment check (refer to procedure)
READ NEXT:
 Suspension - Rear - Check Torque
Warning: If the vehicle has air suspension, activate "Jack"
mode on the touchscreen before raising and supporting the vehicle.
Check the tightening torque of the following fasteners:
Caution: On
Knuckle - Suspension - Rear - LH (Remove and Replace)
Removal
Remove rear brake dust shield (refer to procedure)
Remove nut and bolt securing toe link arm to knuckle (torque 130
Nm).
Remove nut and bolt securing integral link to knuc
Hub - Rear - LH (Remove and Replace)
Special tool(s) required for this procedure:
Supplier
Part Number
Description
Tesla
1062500-00-A
Magnetic F
SEE MORE:
Reservoir Assembly - Coolant (Dual Motor) (Remove and Replace)
Warning: If the 12V power supply is disconnected, do
not attempt to open any doors with door glass in closed position.
Failure to follow this instruction could result in door glass
shatter.
Note: Before disconnecting the 12V power supply,
ensure that the driver's door window
Driveshaft Assembly - Front - RH (Remove and Replace)
Warning: If the vehicle has air suspension, activate "Jack"
mode on the touchscreen before raising and supporting the vehicle.
Removal
Remove the RH front wheel (refer to procedure).
While having an assistant press the brake pedal, loosen the RH
front axle nut, but do n
© 2019-2025 Copyright www.tesms.org
