Tesla Model S: Suspension - Rear - Check Torque
Tesla Model S (2012-2026) Service Manual / Suspension / Suspension - Rear - Check Torque
Warning: If the vehicle has air suspension, activate "Jack" mode on the touchscreen before raising and supporting the vehicle.
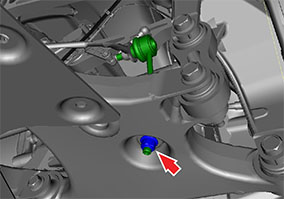
Check the tightening torque of the following fasteners:
Caution: Only fully tighten suspension nuts and bolts when the vehicle is on a 4-post lift and the suspension is in the ride height position.- Sway bar to the drop link (torque 70 Nm).
Caution: To prevent ball joint damage, always hold the
ball joint pin with a wrench while loosening or tightening
the lock nut.

- Drop link to the lower control arm (torque 70 Nm).
Caution: To prevent ball joint damage, always hold the
ball joint pin with a wrench while loosening or tightening
the lock nut.
- Toe link to the subframe (torque 80 Nm).

- Lower control arm to the subframe (torque 115 Nm).

- Integral link to the knuckle (torque 130 Nm).

- Integral link to the lower control arm (torque 130 Nm).

- Upper link to the subframe (torque 130 Nm).

- Toe link to the knuckle (torque 130 Nm).

- Lower control arm to the knuckle (torque 190 Nm).

- Shock absorber to the knuckle (torque 140 Nm).

- Upper link to the knuckle (torque 140 Nm).

READ NEXT:
 Knuckle - Suspension - Rear - LH (Remove and Replace)
Removal
Remove rear brake dust shield (refer to procedure)
Remove nut and bolt securing toe link arm to knuckle (torque 130
Nm).
Remove nut and bolt securing integral link to knuc
Hub - Rear - LH (Remove and Replace)
Special tool(s) required for this procedure:
Supplier
Part Number
Description
Tesla
1062500-00-A
Magnetic F
Control Arm Assembly - Rear - Lower - LH (Remove and Replace)
Warning: If the vehicle has air suspension, activate "Jack"
mode on the touchscreen before raising and supporting the vehicle.
Removal
Loosen the front LH lug nuts.
Raise and
SEE MORE:
Coolant Heater - Electric - Battery - 1st Generation (Remove and Replace)
Warning: Only technicians who have been trained in High
Voltage Awareness are permitted to perform this procedure. Proper
personal protective equipment (PPE) and insulating HV gloves with a
minimum rating of class 00 (500V) must be worn any time a high
voltage cable is handled. Refer
Seal - Liftgate (Remove and Replace)
Removal
Open vehicle tailgate.
Release tailgate seal from body and carefully remove.
Note: Components have been removed in this graphic
to aid clarity.
Installation
Installation procedure is
© 2019-2026 Copyright www.tesms.org
