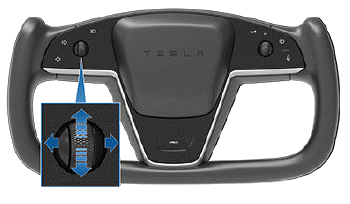
Tesla Model S: Left Scroll Button
Use the scroll button on the left side of the steering yoke to adjust the position of the mirrors and steering yoke. It also controls the wipers and media player.

- When using media player, push the button to the left to go back to the previous song or station or push it to the right to skip to the next song or station.
- To increase/decrease the volume of the sound system, roll the button up/down respectively.
NOTE: The scroll button adjusts the volume for media and phone calls based on what is currently in use. As you adjust the volume, the touchscreen displays the volume level and whether you are adjusting volume for media or phone.
- To mute the media volume, or to pause/play an audio file, push the scroll button.
- When adjusting mirrors, push the button to the left/ right to move the associated mirror inward/outward and up/down to position the mirror upward or downward.
- When adjusting the position of the steering yoke, roll the button up/down to adjust the tilt/angle and press the button to the left or right to move the steering yoke closer or further.
- When a menu displays on the instrument panel from which you can choose options (for example, wipers), use the scroll button to choose an option (up, down, left, or right).
READ NEXT:
 Right Scroll Button
Use the scroll button on the right side of the steering
yoke to control Autopilot features such as Autosteer and
Traffic-Aware Cruise Control:
When driving, push and release the button to engage
 Adjusting Exterior Mirrors
Adjust the exterior mirrors by touching Controls >
Mirrors. Press the left scroll button on the steering yoke
to choose whether you are adjusting the Left or Right
mirror. Then use the left scro
SEE MORE:
 Glove Box (Remove and Replace)
Removal
Remove the RH lower instrument panel (refer to procedure)
Remove the lower glove box panel by releasing the trim clips
(x6).
Open the glove box.
Remove the 6 screws that secure the glove box.
 Software
Learn more about your Model S and the status of
software updates:
Get more information about your Model S such as the
VIN, vehicle name, and odometer. Touch Additional
vehicle information to display a list of the various
options your vehicle is equipped with.
View your current software ver
© 2019-2025 Copyright www.tesms.org

