Tesla Model S: Right Scroll Button
Use the scroll button on the right side of the steering yoke to control Autopilot features such as Autosteer and Traffic-Aware Cruise Control:
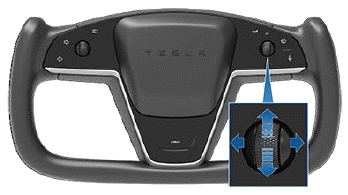
- When driving, push and release the button to engage Autosteer or Traffic-Aware Cruise Control (see Autosteer). If Autosteer Activation is set to Double Click (touch Controls > Autopilot Activation > Autosteer Activation), a single push engages Traffic-Aware Cruise Control (see Traffic- Aware Cruise Control) only and you must push and release twice to engage Autosteer. Once engaged, pushing the button cancels Autosteer and/or Traffic-Aware Cruise Control.
- When Model S is in Park, push the button twice to automatically engage Summon (if equipped) before exiting the vehicle (see Starting Summon Before Exiting the Vehicle).
- When Traffic-Aware Cruise Control is engaged, rolling the scroll button up/down increase/decreases the set cruising speed respectively.
NOTE: There is currently no action associated with pushing the right scroll button to the left and right.
Heated Steering Yoke
To warm up the steering yoke, touch the temperature icon on the touchscreen to display climate controls (see Overview of Climate Controls), then touch the steering yoke icon. When turned on, radiant heat keeps the steering yoke at a comfortable temperature.
Horn
To sound the horn, press and hold the horn button on the right side of the steering yoke.

READ NEXT:
 Adjusting Exterior Mirrors
Adjust the exterior mirrors by touching Controls >
Mirrors. Press the left scroll button on the steering yoke
to choose whether you are adjusting the Left or Right
mirror. Then use the left scro
Folding Mirrors at Specific
Locations
In addition to having mirrors fold automatically
whenever you park Model S, you can fold (and unfold)
mirrors anytime your driving speed is less than 31 mph
(50 km/h). This is useful for parking in
SEE MORE:
Wheel Arch Liner - Upper - Front - LH (Remove and Replace)
Warning: If the vehicle has air suspension, activate "Jack"
mode on the touchscreen before raising and supporting the vehicle.
Removal
Raise and support the vehicle (refer to procedure)
Warning: Do not work on an incorrectly supported
vehicle.
Limitations
Autosteer and its associated functions are particularly
unlikely to operate as intended when:
Autosteer is unable to accurately determine lane
markings. For example, lane markings are excessively
worn, have visible previous markings, have been
adjusted due to road construction, are changing
© 2019-2026 Copyright www.tesms.org
