Tesla Model S: Latch - Hood (Dual Motor) (Remove and Replace)
Tesla Model S (2012-2025) Service Manual / Closures / Latch - Hood (Dual Motor) (Remove and Replace)
Removal
- Remove the front underhood apron (refer to procedure).
- Remove the front fascia applique (refer to procedure).
- Disconnect the harness from the LH side of the latch.

- Remove the bolts (x2) that secure the latch to the crossmember
(torque 10 Nm).
Note: Image shown with harness connected.

- Carefully lift the latch assembly and disconnect the hood latch cables (x2).
- Remove the latch assembly from the vehicle.
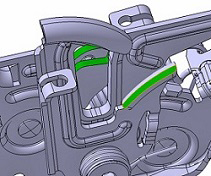
Installation procedure is the reverse of removal, except for the following:
- Apply approximately 0.1 grams of RheoGel TEK676 grease
to both of the areas shown.
Front latch Rear latch 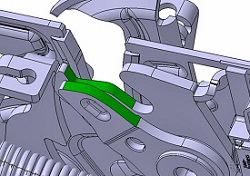
READ NEXT:
 Acoustic Panel - Hood (Remove and Replace)
Removal
Open the hood for access.
Carefully release the clips (x14) that secure the hoodliner to
the hood.
Warning: To avoid personal injury, eye protection
must be
Power Strut - Liftgate (Remove and Replace)
Removal
Open the liftgate.
Support the liftgate in the open position.
Remove the RH C-post upper trim (refer to procedure).
Release the RH rear corner of the headlining from the b
Strut - Liftgate (Remove and Replace)
Removal
Open liftgate.
Support liftgate in open position.
Release clip securing gas strut to body.
Disconnect gas s
SEE MORE:
Actuator - Mode (Remove and Replace)
Removal
Remove IP carrier (refer to procedure)
Disconnect duct temperature sensor harness connector.
Remove screw securing duct to HVAC assembly and position duct
aside (torque 1 Nm).
Disconnect actuator harness
Raise Vehicle - 4 Post Lift
Raise
Position the vehicle centrally between the lift posts.
Warning: To avoid personal injury, use
appropriate equipment when performing this
operation.
Note: Vehicles with air suspension might
need the suspension to be
© 2019-2025 Copyright www.tesms.org
