Tesla Model S: Horizontal Alignment
Tesla Model S (2012-2025) Service Manual / Electrical / Calibration - Front Radar Sensor / Horizontal Alignment
Note: Perform the "Vertical Alignment" procedure before performing the "Horizontal Alignment" procedure.
- Connect a laptop with Toolbox 2.0 or later to the vehicle.
- Perform the Radar Service Drive Alignment (SDA) procedure:
Note: Bring the hex driver in the vehicle during
the drive cycle.
Note: The following steps require an assistant.
- Shift the vehicle into Park.
- Select Panels > Driver Assist > Radar Service Drive Alignment.
- Click the Start/Play button.
- Follow the onscreen instructions. Warning: Perform the calibration procedure in a suitable location and comply with all local traffic safety laws.
- If Toolbox determines that the radar sensor needs to be
adjusted, adjust the horizontal set screw as necessary.
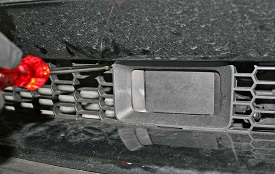
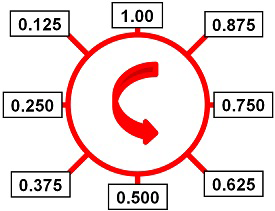
Note: If necessary, use the following images as a guide.
Clockwise turn Counterclockwise turn 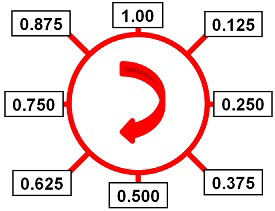
- If the radar sensor was adjusted in the previous step, perform steps 2 and 3 until Toolbox determines that the radar sensor does not need to be adjusted.
- Read DTCs:
- In Toolbox, select Panels > Alerts > DTCs.
- Ensure that the "Check all" box is checked.
- Click Read DTCs.
- Clear DTCs as necessary.
Receiver - Remote Keyless Entry (RKE) - Immobilizer (Remove and Replace)
RemovalRemove the Body Controller Module:
- If the vehicle is left hand drive (LHD), refer to procedure.
- If the vehicle is right hand drive (RHD), refer to procedure.
Installation procedure is the reverse of removal.
READ NEXT:
 Casing - Transmitter - Remote Keyless Entry (RKE)
Caution: Perform this procedure while using the proper anti-electrostatic
discharge equipment. Refer to TN-14-92-003, "Electrostatic Discharge
Tooling".
Removal
Remove the transm
Transmitter - Remote Keyless Entry (RKE) - Programming
Key LearnCaution: Before beginning this procedure, it is necessary to
have all keys present. Any keys that are not present will deactivate
after completing the procedure.
Sit in the d
LF Antenna - Bumper Carrier (Remove and Replace)
Removal
Remove the underhood storage unit (refer to procedure)
Disconnect the LF antenna harness connector.
Working thr
SEE MORE:
Motor - Door - Exterior Handle - Rear - LH (Remove and Replace)
Removal
Remove door handle for access (refer to procedure)
Position handle assembly on a soft working surface.
Remove door handle rear seal.
Remove cable ties securing door pressure sensor and motor
wiring.
Release motor wiring connector.
Remove screws (x4) securing
Switch - Brake Light (Remove and Replace)
Removal
Remove the driver's side lower dash trim (refer to procedure).
Rotate the brake light switch 45 degrees clockwise and release
it from the brake pedal assembly.
Caution: The brake light switch is a one time use
component. Ensure that a new switch is used
© 2019-2025 Copyright www.tesms.org
