Tesla Model S: Front Drive Unit (From Below) (Remove and Install) - Installation
Tesla Model S (2012-2025) Service Manual / Front Drive Unit / Front Drive Unit (From Below) (Remove and Install) / Front Drive Unit (From Below) (Remove and Install) -
Installation
Installation
Installation procedure is the reverse of removal, except for the following:- Use alcohol wipes to clean the mating surfaces between the RH motor mount and drive unit.
-
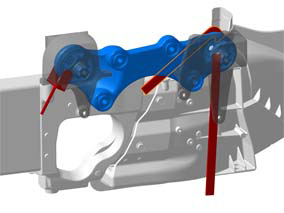
When securing the motor to the mounts, use the shim tools to
ensure that there is sufficient clearance:
-
Attach the 15 mm ratchet tool to a torque wrench.
Caution: Ensure that the ratchet tool is 90 degrees perpendicular to the handle of the torque wrench when using the tool.

1 90 degree angle -
Position the 3 shim tools between the RH motor mount and
body.
-
Install the bolts (x4) that secure the motor to the RH mount
in the order shown (torque 75 Nm).
Note: Use the ratchet tool to fully tighten the first and fourth bolt.

- Install the bolts (x3) that secure the motor to the LH mount (torque 38 Nm).
-
Attach the 15 mm ratchet tool to a torque wrench.
-
When installing the driveshaft into the drive unit:
- Ensure that the opening of the snap ring is facing towards the bottom of the drive unit.
- Do not damage or displace the oil seal.
- Verify that the driveshaft is fully seated by carefully pushing it into the drive unit until there is an audible "click" from the snap ring.
- Recharge the AC system.
-
Fill the drive unit with the correct amount of proper fluid:
Note:
- Use the fluid specified in General Information > Fluids and Capacities > Fluids .
- Use the amount specified in General Information > Fluids and Capacities > Fluid Capacities .
READ NEXT:
 Front Drive Unit (From Below) (Remove and Replace)
Special tool required for this procedure:
Supplier
Part Number
Description
Mount - Front Drive Unit - RH (Remove and Replace) - Removal
Warning: If the 12V power supply is disconnected, do
not attempt to open any doors with door glass in closed position.
Failure to follow this instruction could result in door glass
shat
SEE MORE:
Charge rate reduced - Charge port may be frozen
Try using Defrost Car button in Mobile App
The charge port latch is unable to secure the charge cable in the charge port
inlet, and cold ambient temperature is
detected. If the latch is not engaged, AC charging (for example, charging with a
Mobile Connector or Wall
Connector) will be limited to
Sliding Glass - Panoramic Roof Assembly (Remove and Replace)
Removal
Note: Before beginning
this procedure, prepare a covered surface or workbench to
support the moving glass after it is removed from the vehicle.
Fully open the panoramic moving glass.
Remove and discard the mounting screws (x4)
that s
© 2019-2025 Copyright www.tesms.org
