Tesla Model S: Fascia Assembly - Front (Remove and Replace)
Tesla Model S (2012-2025) Service Manual / Body / Fascia Assembly - Front (Remove and Replace)
Removal
- Remove the front fascia (refer to procedure).
- Remove the front fascia applique:
- If the vehicle has the 1st generation front fascia applique, refer to procedure.
- If the vehicle has the 2nd generation front fascia applique, refer to procedure.
- Remove the fog lamps (refer to procedure).
- Disconnect the remaining parking distance sensor connectors, if equipped.
- Release the clips (x6) that secure the harness to the fascia.
Remove the harness.
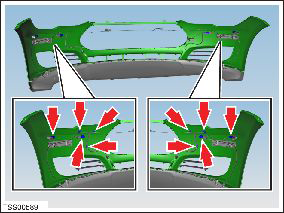
- Carefully release the parking distance sensors from their retainers, if equipped.
- Remove the bolts (x4) that secure the chin spoiler to the fascia (torque 3 Nm).
- Release the clips (x13) that secure the chin spoiler to the
front fascia.
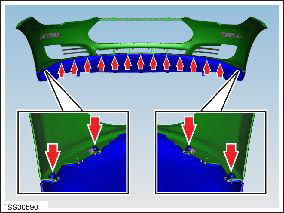
- Remove the chin spoiler from the fascia.
Installation procedure is the reverse of removal, except for the following: If equipped, calibrate the front radar sensor (refer to procedure).
READ NEXT:
 Bumper Assembly - Front (Remove and Replace)
Warning: If the 12V power supply is disconnected, do
not attempt to open any doors with door glass in closed position.
Failure to follow this instruction could result in door glass
shat
Ankle Catcher Assembly (Remove and Replace)
Removal
Remove the front fascia (refer to procedure).
Remove the bolts (x2) that secure the center of the ankle
catcher to the front ducting (torque 4 Nm).
Applique - Fascia - Front - 1st Generation (Remove and Replace)
Note: This procedure describes how to remove and replace
the 1st generation front fascia applique. If the vehicle is equipped
with a 2nd generation front fascia applique, refer to procedure
SEE MORE:
Poor electric grid power quality detected
Try different charging station or location
Charging speed has been reduced or charging has been interrupted due to a
condition that affects your vehicle's
ability to charge with AC power. DC fast charging / Supercharging should still
function as expected.
The onboard charger in your vehicle has
Module - Park Assist (Remove and Replace)
Removal
Remove the LH side rear trunk trim for access (refer to
procedure).
Disconnect the harness connections (x3) from the module.
Caution: Mark the harnesses so that they are
reinstalled properly.
© 2019-2025 Copyright www.tesms.org

