Tesla Model S: Seat Cushion - Lower - 2nd Row (Remove and Install)
Tesla Model S (2012-2025) Service Manual / Seats / Seat Cushion - Lower - 2nd Row (Remove and Install)
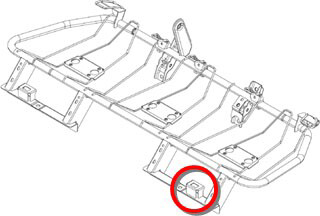
Removal
- Remove the 2nd row center console assembly, if installed (refer to procedure).
- Gently lift up the LH side of the 2nd row seat bottom cushion to
expose the grommet tower.
Caution: Do not remove the cushion by forcefully
pulling up on it. This might warp the cushion.
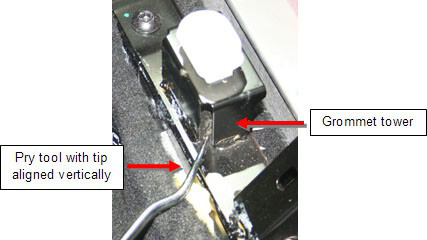
- Hold a pry tool with the tip aligned vertically. Insert the pry
tool into the vertical slot in the corner of the grommet tower.
Note: Shown with cushion removed for clarity.
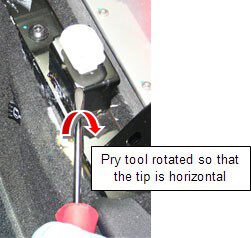
- Rotate the pry tool so that the tip is in a horizontal position
underneath the grommet.
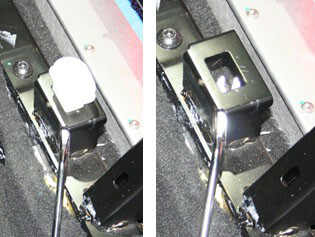
- Pry up on the grommet to release it from the grommet tower.
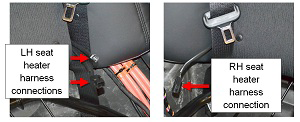
- If the vehicle is equipped with the Cold Weather package,
disconnect the 2 seat heater harness connections on the LH side of
the vehicle and the 1 seat heater harness connection on the RH side
of the vehicle.
- If the vehicle is European or APAC specification, disconnect the seat belt reminder sensor harnesses
- Remove the rear cushion.
- Position the rear of the cushion so that the seat belt buckles fit properly into the cutouts in the cushion.
- Press down firmly on the cushion in the areas above the grommet towers.
READ NEXT:
 Seat Cushion - Lower - 2nd Row - Executive - LH (Remove and Replace)
Removal
Remove the 2nd row center console (refer to procedure).
Use both hands to firmly pull up on the front of the cushion to
release the 2 clips that secure it to the frame. Do not
Back Rest Assembly - Seat - 2nd Row - LH (Remove and Install)
Removal
Remove rear seat base cushion for access (refer to procedure)
Remove the bolt that secures the seat belt to the 2nd row seat
base frame (torque 40 Nm).
Back Rest Assembly - Seat - 2nd Row - RH (Remove and Install)
Removal
Remove RH rear seat bolster (refer to procedure)
Use a pry tool to release the grommet that secures the RH 2nd
row backrest.
SEE MORE:
200A Fuses - Wall Connector (Remove and Replace) - Installation
Installation
Clean the contact surfaces of the new upper and lower bus bars
with alcohol wipes.
Position the new inner fuse. Install the screw at the L2
terminal (torque 3 Nm).
Install the inner wire's ring lug on the inner contactor stud.
Caution: Position both
Assembly - Bin - Storage Center Compartment (Remove and Replace)
Removal
Remove center console carpet.
Caution: Apply contact adhesive to mating faces if
bond has been broken.
Release clips (x4) securing closing panel to dash.
Caution: Take care not to damage component(s).
Caution: Repl
© 2019-2025 Copyright www.tesms.org

