Tesla Model S: Integral Link - Rear - LH (Remove and Replace)
Tesla Model S (2012-2025) Service Manual / Suspension / Integral Link - Rear - LH (Remove and Replace)
Warning: If the vehicle has air suspension, activate "Jack" mode on the touchscreen before raising and supporting the vehicle.
Removal
- Remove road wheel (refer to procedure)
- Remove nut and bolt securing link to suspension knuckle (torque 130 Nm).
- Remove nut and bolt securing link to lower control arm (torque
130 Nm).
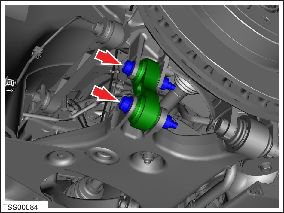
- Remove integral link.
- Installation procedure is the reverse of removal, except for the following: Note: Clean the affected areas before installation. Caution: Replace all nylon-insert locknuts. Caution: Only fully tighten suspension nuts and bolts when the vehicle is on a 4-post lift and the suspension is in the ride height position.
- Transfer vehicle to a 4 post lift (refer to procedure)
- Perform a four wheel alignment check (refer to procedure)
READ NEXT:
 Air Spring Module - Front - LH (Remove and Replace)
Warning: If the vehicle has air suspension, activate "Jack"
mode on the touchscreen before raising and supporting the vehicle.
Removal
Raise and support the vehicle (refer to procedu
Air Spring Module - Rear - LH (Remove and Replace)
Warning: If the vehicle has air suspension, activate "Jack"
mode on the touchscreen before raising and supporting the vehicle.
Removal
Raise and support the vehicle (refer to procedu
Air Suspension - Pressurize/Depressurize - One Air Spring
Depressurize
Connect a laptop with Toolbox to the vehicle.
Press the brake pedal to turn on the drive rails.
Leave the driver's door open to keep the drive rails on.
In Toolbox, sele
SEE MORE:
Assembly - Back Rest - Driver's Seat (Remove and Replace)
Removal
Remove driver's seat assembly (refer to procedure)
Place seat on clean work surface.
Remove screw securing outer side cover to seat (torque 1 Nm).
Carefully release outer side cover from retaining bracket an
Guidelines for Seating Children
Your Model S seat belts are designed for adults and larger children. You must
restrain infants and small children in
the rear seats only, and you must use a suitable child safety seat appropriate
for the child's age, weight, and size.
WARNING: Never seat a child in the front row passenger seat,
© 2019-2025 Copyright www.tesms.org
