Tesla Model S: Bracket - License Plate - Front (Retrofit)
Tesla Model S (2012-2025) Service Manual / Exterior fittings / Bracket - License Plate - Front (Retrofit)
Special tool required for this procedure:
| Supplier | Part Number | Description |
| Tesla | 223-28550-TSL | WIHA (TORQUE SCREWDRIVER .1 - .6NM) |
- Clean the affected area with a clean shop towel.
- Test fit the license plate bracket on the front fascia applique:
- The middle hole in the license plate bracket is
centered below the Tesla logo.
Tip: Use tape or similar means of ensuring that the hole is completely centered.

- There is no gap between the base of the front fascia
applique and the curved section at the base of the
license plate bracket.
Bracket flush with applique Gap between bracket and applique 

- The middle hole in the license plate bracket is
centered below the Tesla logo.
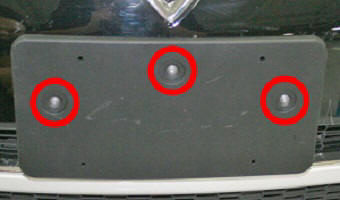
- Use a paint pen to mark the front fascia applique at the center
of the holes (x3) in the license plate bracket. Remove the license
plate bracket.

- Drill a hole through the front fascia applique in the areas
marked in the previous step.
- 1st generation front fascia applique: Use a 19/64 in drill bit.
- 2nd generation front fascia applique: Use a 1/8 in (3.5 mm) drill bit.
- Clean the affected area.
- Install the front license plate bracket:
- 1st generation front fascia applique: Secure the license plate bracket with push clips (x3).
- 2nd generation front fascia applique: Secure the license plate bracket with the self-tapping screws (x3) (torque 0.5 Nm).
Caution: Do not overtorque the screws.
1st generation applique: 2nd generation applique: 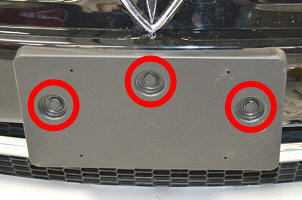
READ NEXT:
 Door Mirror Assembly - LH (Remove)
Removal
Lower the front window glass.
Remove the door trim panel (refer to procedure).
Carefully release the clips (x2) that secure the front top end
of the flap seal to the door.
Door Mirror Assembly - LH (Replace)
Installation
Installation procedure is the reverse of removal, except for the
following:
Inspect the mirror area of the door panel. Install 2 nylon shims
SEE MORE:
Autopark canceled
Take control
Autopark has been canceled. You need to park or finish parking your vehicle
manually.
Once the parking maneuver is complete, apply the brakes and shift into Park.
Your vehicle will otherwise remain free-
rolling.
Autopark can be canceled due to many factors, including the following:
Head Supports
The front seats include integrated head supports that
you cannot adjust.
The rear outboard seating positions include an
adjustable head support that can be raised/lowered or
removed. The head support should always be raised and
locked into position (so that the center is aligned with
the cente
© 2019-2025 Copyright www.tesms.org
